Showing posts with label MySQL. Show all posts

Monday, 18 April 2011

SQL and PHP

Introduction

Having a dynamic website that responds quickly to user requests and provides updated information 24/7 is a must. Nowadays, many organizations are aware that a web site is not a onetime shot; a web site needs maintenance.
A web site that is frequently updated will attract more audience; provide always the latest news and the latest offers if promoting goods.
Most well structured web sites are supported by a database backend. Such backend provides a way to easily store, manage and retrieve data. In simple terms, if all data is stored in a database maintenance is easier.
Nowadays, databases enable you to store different sorts of data and amongst others in conjunction with a web site a database can be used to:
  • Store user accounts
  • Store products
  • Record all transactions
  • Keep track of visitors and actions
  • Store images and files
To implement a database backend, you need to have a clear view of the requirements. Reason being that pushing data in one location may cause a size concern; store only what is required.
More than a file, a database backend is an environment and to implement such environment you need to install a Database Management System (DBMS). A DBMS provides the require tools to create, manage, maintain and secure your databases. The most commonly used are:
In this blog I will use MySQL that is including in the XAMPP package, and will describe how to create a log-in page using a database table with PHP scripting.

Task Description

This blog describes my experience while performing a task assigned by my tutor. The task consists of the following stages:
  • Log into the SQL server using command line and perform some commands such as listing the databases.
  • Attempt to connect to SQL by using PHPMYADMIN.
  • Create a database that stores usernames and passwords.
  • Modify your PHP program from the previous lab session to connect to the database to authenticate the user.

MySQL command line

Open command line

In XAMPP the MySQL tools are located in <XAMPP installation folder>\mysql\bin. To access MySQL from a command line:
1.    Open a command line interface.
2.    Open the MySQL folder C:\XAMPP\mysql\bin and open MySQL using the following command line code mysql -u root -p
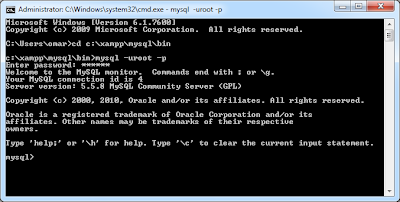
3.    The command line will prompt for the MySQL root password.

Command line examples

The following syntax will list all databases:
SHOW DATABASES;
The following syntax creates a new database named blog_database:
CREATE DATABASE blog_database;
The show databases syntax can be used to ensure that the new database has been added,
The following syntax adds a new user  ‘omar’ having a password ‘12345’:
CREATE USER 'omar'@'localhost' IDENTIFIED BY '12345'
In MySQL, users are stored in mysql.user table. To list all users the following syntax is used:
SELECT host,user FROM mysql.user;

The following syntax is used to add a new table tblUsers to the Blog_Database.
CREATE TABLE `Blog_Database`.`tblUsers` (
`uname` VARCHAR( 20 ) NOT NULL ,
`fldName` VARCHAR( 50 ) NOT NULL ,
`fldSurname` VARCHAR( 50 ) NOT NULL ,
`fldPassword` VARCHAR( 50 ) NOT NULL ,
`fldEmail` VARCHAR( 50 ) NOT NULL ,
PRIMARY KEY ( `uname` )
) ENGINE = InnoDB;
To display information on a specific table, the following syntax is used:
desc <table name>;
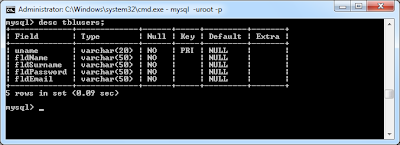
To display the list of tables in a database, the following syntax is used:
show tables;

Using phpMyAdmin

This free software is written in PHP and enables you to manage instances of MySQL over the web. For more information, refer to phpMyAdmin Home page. phpMyAdmin is also included with the XAMPP package. To launch phpMyAdmin from a XAMPP installation, launch the following page from an internet browser: http://localhost/phpmyadmin/ and key in your MySQL user name and password.
Manage your MySQL Databases
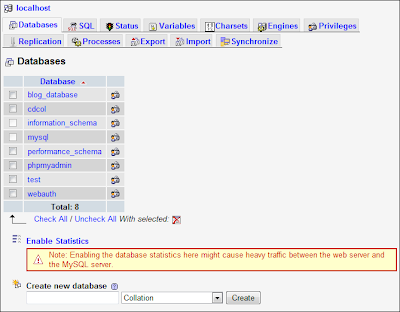
Create and run sql statements 
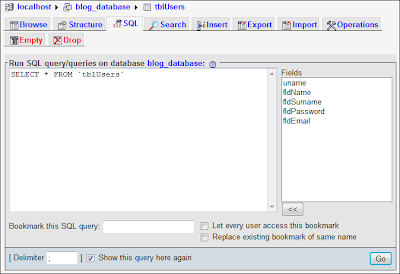
 

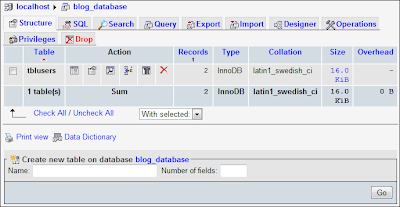
Manage tables
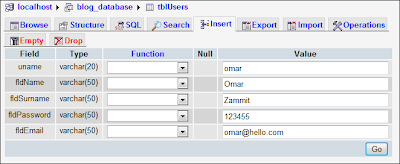
Insert data into a table
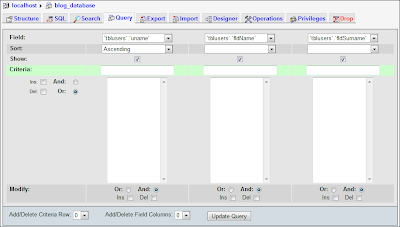
Easy to use query builder
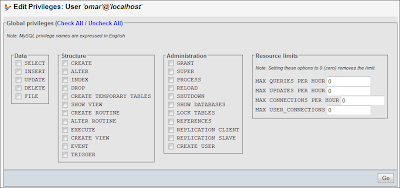
Manage users and privileges
Alternatives

In my opinion, phpMyAdmin is a powerful tool to have but personally to manage MySQL instances I prefer using SQL yog or MySQL Workbench; interface is more intuitive and very easy to use.

Create a database

To create a database backend for my login page, I performed the following steps.
Step 1: Create a new database ‘blog_database’ using the following syntax:
CREATE DATABASE blog_database;
Step 2: Create a new table ‘tblUsers’ using the following SQL syntax:
CREATE TABLE `Blog_Database`.`tblUsers` (
`uname` VARCHAR( 20 ) NOT NULL ,
`fldName` VARCHAR( 50 ) NOT NULL ,
`fldSurname` VARCHAR( 50 ) NOT NULL ,
`fldPassword` VARCHAR( 50 ) NOT NULL ,                                   
`fldEmail` VARCHAR( 50 ) NOT NULL ,
PRIMARY KEY ( `uname` )
) ENGINE = InnoDB;
Step 3: Add some data (three users) using the following SQL syntax:
INSERT INTO `tblUsers`
(`uname`, `fldName`, `fldSurname`, `fldPassword`, `fldEmail`)
VALUES
('christ', 'Christine', 'Bezzina', '53241', 'christb@inbox.com');

INSERT INTO `tblUsers`
(`uname`, `fldName`, `fldSurname`, `fldPassword`, `fldEmail`)
VALUES
('eliza', 'Eliza', 'Grech', '101010', 'eligre@inbox.com');

INSERT INTO `tblUsers`
(`uname`, `fldName`, `fldSurname`, `fldPassword`, `fldEmail`)
VALUES
('omar', 'Omar', 'Zammit', '12345', 'omarz@inbox.net');
Step 4: Create a user with only SELECT privilege over tblUser table.
CREATE USER 'webuser'@'localhost' IDENTIFIED BY '12345';
REVOKE ALL PRIVILEGES ON *.* FROM webuser@localhost;
GRANT SELECT ON blog_database.tblUsers TO webuser@localhost;
Step 5: View all table data from a command line
SELECT * FROM blog_database.tblUsers;


Log-in pages

The log-in page enables the user to enter valid credentials to log-in to the system. Once the credentials are entered the log-in page will search the values from a database table using a select statement similar to the following:
SELECT * FROM `tblusers` WHERE uname='$User' and fldPassword='$Password'
Where $User and $Password are the user name and password parameters.
If the values are found, the database table row is stored in a variable and the fields’ data is displayed in a new page (welcome.php).

The index.php page


When this page is submitted, the values supplied by the user are validated using the validateUser(<User name>,<Password>) function; Line 10.
The values returned by the validateUser() function are stored in a session variable in line 19. Once stored, the welcome.php page is called.
If validateUser() returns a null value, the error at line 25 is displayed in the index.php page.
In line 33, the validateUser() function, creates an SQL connection using a MySQL user account.
In line 37 is using the mysql_select_db, to instruct the MySQL instance to use and run the queries on the blog_database.
In line 40, the SELECT statement will search for the user name and password submitted by the user. If credentials submitted are valid, the statement will return a database table row; this is stored in $rows.
In line 44, the first row is split into a new array ($row) and in line 50 this array is returned as a function result.

The welcome.php page

In line 13, the welcome.php page checks if a session containing the user details, exists. If the session is found, the details are stored in a variable $username (line 18). Lines 21 to 24 display the user information.

Using the log-in page

Launching index.php

Submitting invalid credentials – the error message

Submitting valid credentials – the welcome page


A bit of security

It is highly recommended that passwords are not stored into a database in plain text; if the database password is compromised, all passwords are accessible. The best way to protect your password is by using encryption and hashing algorithms. Such cryptographic methods will encrypt the password in an unreadable format and store the encrypted value. During validation, the user input is encrypted and compared with the stored value.

Crypt

PHP has its own cryptographic function and can be called using the following syntax:
$Variable= crypt (<Value>, <Salt>);
Where Value is the string text to encrypt and Salt the characters that will be used to encrypt the Value.
The crypt function supports four types of encryption algorithms:
Algorithm
Salt - Number of characters
CRYPT_STD_DES
2
CRYPT_EXT_DES
9
CRYPT_MD5
12
CRYPT_BLOWFISH
16
For more information, refer to PHP crypt function.

MD5

MD5 is one of the most commonly used one way hashing algorithm. This method transforms a message into a fixed-length outcome. Making the contents difficult to translate and decipher. To transform a value using MD5, the following PHP syntax is used:
$variable = md5(<Value>);
For more information, refer to the PHP MD5 function.

Other methods

Other more secure methods exist, and amongst others, one can find:
  • Mcrypt – an encryption library with 22 different algorithms. For more information, refer to the Mcrypt manual.
  • Mhash – an encryption library with 12 different algorithms. For more information, refer to the Mhash manual.

Conclusion

The phpMyAdmin included with the XAMPP package enabled me to perform some database tasks. The tool is powerful and easy to use but personally I prefer SQL yog or MySQL Workbench.
While performing the steps in this task, I was really impressed how easy it is to interface with a database from a PHP script; compared to other scripts it’s pretty straight forward.
Various encryption methods exist to protect plain text passwords, I prefer MD5 because it’s easy to implement and secure.

Resources

Download the database log-in sample files.

Tuesday, 29 March 2011

XAMPP

Introduction

In a client server environment, all client requests are handled and interpreted by a Server. In computer terms a server is a machine, connected to the network (and/or Internet) running various services.
The server continuously is listening and waiting for a client to connect/request. As soon as a client requests a service using a standard protocol, the server will interpret the request and provide a response.
Depending on the infrastructure and number of requests, a server can provide one or more services.

What types of servers exist?

Different servers exist, but the most popular are:
  • Proxy servers – Usually these are located between a group of client computers and the Internet, and is used to filter client requests and server responses. (Microsoft ISA server)
  • Mail servers – Used to store e-mails in an organisation. Nowadays, many internet service providers have their own mail servers to provide email accounts for their subscribers. (Microsoft Exchange Servers)
  • Web servers – Used to host web pages. When a user requests a web page, the web server retrieves the requested file and sends it back to the user. With the introduction of dynamic web pages, nowadays, web servers perform server side scripting. (Apache)
  • FTP servers – Usually this is a file repository (File server) that enables users to upload and download files using the File Transfer Protocol (FTP). (Filezilla server)
  • Virtualization environments – Enables users to create and manage Virtual servers. (Microsoft Hyper-V and VMware)
  • Database servers – These include a Database Management Systems (DBMS) and enables applications to connect and retrieve data remotely. (Microsoft SQL Server)
In this blog I will describe my experience and what I’ve learned while performing a task assigned by my tutor.

XAMPP


What is XAMPP?

From a personal experience, installing and configuring various services from different vendors/providers on the same machine, is a difficult job. Various issues may rise and the majorities are all related to compatibility and system requirements.
Another drawback is price. Just imagine a student web developer having to buy software licensing just to get acquainted and gain some experience with these services.  
Peace of mind, some commonly used services are free, and thanks to the Apache Friends, these can be downloaded as a bundled package.
The XAMPP package can be downloaded from Apache Friends for various operating systems, including:
  • Linux
  • Windows
  • Mac OS X
  • Solaris
Amongst others XAMPP includes the following modules:
  • Apache web server
  • MySQL
  • PHP
  • Perl
  • phpMyAdmin
  • Webalizer
  • Mercury Mail Transfer
  • Filezilla FTP Server

Why XAMPP?

“The philosophy behind XAMPP is to build an easy to install distribution for developers to get into the world of Apache. To make it convenient for developers XAMPP is configured with all features turned on.” (http://www.apachefriends.org/en/xampp.html)

While using XAMPP I noted the following advantages:
ü  One installer for multiple modules; you just need to run one setup.
ü  No special knowledge is required to get it up and running.
ü  Intuitive and easy to use control panel.
ü  Includes various tools; amongst others, XAMPP Security report, Webalizer and phpMyAdmin.
ü  Minimum system requirements.
ü  XAMPP is FREE
The only issues I had while doing this task where not directly related to XAMPP. These are described in this blog but the following is a summary:
û  To install XAMPP on Windows 7 I had to turn off the User Access Control (UAC).
û  To connect from a remote computer, I had to enable a number of ports in my server firewall.

Task Description


This blog describes my experience while performing a task assigned by my tutor. The task consists of the following stages:
  • Install XAMPP on your computer
  • Test the following functions:
    • Control panel
    • Test HTTP and HTTPS
    • Test FTP
    • Generate a XAMPP security report
    • Generate a PHPINFO report
    • Generate a visitors report
    • Test the default guestbook
  • Add and image and a style sheet to the default index page
  • Test the web services from another computer

Preparing the environment


To test XAMPP, using VMware server, I implemented the environment described in this section.

XAMPP is installed on the Server (192.168.2.6), a Windows 7 machine with Windows Firewall enabled. The Client (192.168.2.5) is used to connect to the Server and test the XAMPP services.
The first thing to check when implementing such networks is communication. Communication between Client and Server can be tested using the command line PING.
Using Internet Control Message Protocol (ICMP), the PING command sends a number of packets to a destination and waits for a reply. When using PING from a command line, the time taken for a packet from source to destination and back to source is calculated and displayed.  
Using my environment as an example, to test connectivity from my client machine I used the following command line:

ping 192.168.2.6

Important to note that PING will not work if the Windows Firewall is configured to block ICMP messages. In fact to be able to send a PING request to the server I created an inbound firewall rule that allows ICMP messages. For more information on how to create such rule, refer to Nobody Can Ping My Computer Microsoft article.

Installing XAMPP


Download XAMPP

The XAMPP installer for Windows can be downloaded from the Apache friends web site and is compatible with Windows 2000, 2003, XP, Vista, and Windows 7.

Installation

Since XAMPP needs to install and run services, it is recommended to run the XAMPP installer as an administrator. To achieve this in Windows 7, right click the XAMPP installer and select Run as administrator.

UAC problems

After selecting the installation language, I bumped into the following warning:
The problem when installing XAMPP on Windows Vista and Windows 7 is that it may conflict with Microsoft User Account Control (UAC); UAC may prevent XAMPP to work correctly. UAC was introduced in Windows Vista to provide a more secure infrastructure and monitors software applications and services. To solve this issue in my testing environment I deactivated UAC. To disable UAC:
1.    Stop the XAMPP installation.
2.    In the Start menu search box, type msconfig and press Enter.
3.    Select the Tools tab in System Configuration.
4.    From the list select Change UAC settings and click Launch.
5.    From the User Account Control Settings select Never Notify. Click OK.
6.    Restart your computer.
7.    Restart XAMPP installation.When UAC is deactivated, the XAMPP installer launches another warning stating that activating UAC may restrict XAMPP functionality. Ignore the message and continue the installation.
For more information on UAC, refer to User Account Control Step-by-Step Guide and Security Watch.

The installation wizard

Once started, the installation wizard enables you to select the language and configure where to install the XAMPP files. During the installation, the XAMPP Options dialog enables you to install all XAMPP modules as services. When installed as services, modules are started automatically when starting the Server.

The Control Panel

Upon installation, XAMPP enables you to launch the Control Panel. Amongst others, the control panel enables you to:
  • Start and stop a service
  • Configure administration settings for each module
  • View each module status
  • Quick link to the XAMPP installation folder

Testing installation


Introduction

This section describes the tests I performed to ensure that the XAMPP modules are installed and working correctly. All tests are done on the server machine.

HTTP and HTTPS

To test if HTTP and HTTPS are working on the server machine first you should try to access the XAMPP default page from a web browser.
To test HTTP, launch any Internet browser and browse to http://localhost. If the Apache service is running the following page should be displayed.
To test HTTPS, launch any Internet browser and browse to https://localhost. If the Apache service is running the following page should be displayed.
Since the server security certificate is not verified by a Certificate Authority, the Internet browser will complain that the web site is not trusted.


FTP

To test the FTP module, from the server machine I downloaded and installed Filezilla FTP client; available from FileZilla client download. Filezilla enables users to connect, browse, upload and download files from FTP servers.
When installing XAMPP, the following two FTP accounts are installed by default:
User name
Password
Root directory
newuser
wampp
<Home Directory>\xampp\htdocs\
anonymous
<No password>
<Home Directory>\xampp\anonymous\

Using Filezilla, I connected to the FTP server using the newuser credentials.

While browsing and moving files using FTP, I monitored the actions in the Filezilla server.
You can test FTP using Windows Command line as follows:
1.    Launch a command line interface.
2.    Key-in ftp 127.0.0.1 and press Enter.
3.    Key-in the username (newuser) and press Enter.
4.    Key-in the password (wampp) and press Enter.
5.    After connecting, key-in the FTP subcommand ls and press Enter to list the folder contents.
For a full list of subcommands, refer to FTP Syntax.

XAMPP Status

The XAMPP status enables you to generate a report that shows the status of all installed XAMPP modules. To generate a XAMPP status:
1.    From an internet browser connect to http://localhost/
2.    From the left panel, click Status.

NOTE: As the page suggest, generating reports over HTTPS may give false results.

XAMPP security report

The XAMPP security report enables you to generate a report that shows the security status of all installed XAMPP modules. To generate a XAMPP security status:
1.    From an internet browser connect to http://localhost/
2.    From the left panel, click Security.
The XAMPP security reported the following issues:


Issues 1 to 3

These issues are reported because of the following:
1.    XAMPP pages can be accessed by everyone over the network without a password.
2.    MySQL Root account has no password.
3.    phpMyAdmin can be accessed without a password. (phpMyAdmin is a tool that enables you to manage MySQL, for more information refer to phpMyAdmin home page)
Luckily enough, XAMPP provides a quick link that enables you to solve these issues. This can be achieved by doing the following:
1.    From an internet browser, launch http://localhost/security/xamppsecurity.php.
2.    Key-in a new Root password for MySQL and click Password Changing.
3.    Key-in a new User name and password for the XAMPP directory. Click Make safe the XAMPP directory.
NOTE: Once the XAMPP directory is configured, to access the XAMPP directory, you must provide the username and password configured in step 3.

Issue 4

To solve this issue you must change the default FTP password for newuser. To change the default password:
1.    Launch XAMPP control panel and click the Filezilla Admin button.
2.    Click OK when asked for credentials.
3.    From the Filezilla server, click the user button and select newuser from the list.
4.    Key-in a new password in the Password text box.
5.    Click OK.

Issue 5

The PHP ‘Safe Mode’ was designed to prevent unauthorized scripts to run at the operating system level; preventing hackers from accessing the server.
The problem with ‘Safe Mode’ is that innocuous script that is needed to run a web site may not function correctly. Since I’m using a virtual environment I will ignore the message and leave PHP with the default configuration.

Issue 6
Mercury is an SMTP mail server and since it is outside the scope of this task, I will not go into further details. The Security report is not identifying a security issue but is indicating that the Mercury POP3 server is not running.

PHPINFO report

The phpinfo () function enables you to generate a report and view how your PHP installation is configured. This report is useful because:
  • It helps you understand your environment.
  • Enables you to identify installed functions and modules
  • It helps when debugging and troubleshooting issues.
To generate a PHP report from your XAMPP installation:
1.    Launch an internet explorer on your server (where XAMPP is installed).
2.    Browse to http://localhost/xampp/.
3.    From the left panel, click phpinfo().
The phpinfo() function enables you to specify parameters to customize the report. The following script generates the report, showing only the General section.
<?php
phpinfo(INFO_GENERAL);
?>
For a full list of parameters, refer to phpinfo parameters.

Generate a visitors report

One of the tools available in the XAMPP package is Webalizer, a web server log that enables you to generate statistical usage reports.
To generate a usage report from your XAMPP installation:
1.    Launch an internet explorer on your server (where XAMPP is installed).
2.    Browse to http://localhost/xampp/
3.    From the left panel, click Webalizer.


Amongst others, the report shows:
  • Monthly statistics
  • Daily and hourly usage per month
  • Top visited URLs and Top visited URLs by Kbytes
  • Top visited entry and exit pages
  • Top visited sites
  • Top visitors by username
  • Top visitors by country
For more information on Webalizer, refer to the Webalizer home page and the Webalizer FAQ.

Test the default guest book

The default guest book in XAMPP is written in Perl and can be launched as follows:
1.    Launch an internet explorer on your server (where XAMPP is installed).
2.    Browse to http://localhost/xampp/
3.    From the left panel, click Guest Book.
It’s very easy to use and to add an entry you just need to key-in your name and email, add your comment and click Write.

Modify the default index page


In Apache, all web pages should be added to the htdocs folder; this is the folder that by default Apache looks for files and is located at <Home Directory>\xampp\htdocs\. When installing XAMPP, a default page is added, this enables you to test your web server. To create my custom default page I did the following:
1.    Added a folder containing some images.
2.    Modified the contents of the index.html page.
3.    Added a style sheet style.css.
From the server machine I loaded the page using http://localhost/index.html. The output is as follows:
Different sites and web applications can exist within the same htdocs folder. The following image shows a scenario where multiple web sites exist on the same server:

NOTE: You can use an FTP client to upload and modify the htdocs contents.

Test the web services from another computer


Firewall ports to enable

As described previously, I’m using Windows firewall on my server machine. To enable other computers (clients) to connect and use the XAMPP modules over the network, the firewall should allow traffic on the following ports:

Port number
Protocol
Type
Services
21
TCP
Inbound and Outbound
FTP
80
TCP
Inbound and Outbound
HTTP
443
TCP
Inbound and Outbound
HTTPS
25
TCP
Inbound and Outbound
SMTP
110
TCP
Inbound and Outbound
POP3
143
TCP
Inbound and Outbound
IMAP
3306
TCP
Inbound and Outbound
MySQL
8080
TCP
Inbound and Outbound
HTTP alternative

NOTE: For maximum security, ONLY allow the required ports. For example, since in my environment I’m going to test HTTP, HTTPS and FTP I enabled only ports 21,443 and 80.

Web Server


XAMPP default page

My XAMPP default page is password protected, so users cannot access the XAMPP configuration page from a remote computer. To test this, load an internet browser from a client machine and browse to the server XAMPP folder; for example http://192.168.2.6/xampp/


HTTP

To test HTTP, I launched the default index page in the htdocs folder using http://192.168.2.6/index.html.

HTTPS

To test HTTPS, I launched the default index page in the htdocs folder using https://192.168.2.6/index.html.


FTP Server

From my client computer, I used Filezilla and the XAMPP default account (newuser) to connect to the FTP server.

As seen in the figure below, by default the newuser account home directory is the htdocs folder.

I used this to transfer files from my client computer in the htdocs folder, and change my web page without even logging into my server.

Conclusion


XAMPP is awesome and I recommend downloading. As seen in this blog, the steps to get XAMPP modules up and running are easy to achieve and can be tested with minimal effort. I installed XAMPP on one of my personal machines at home. This is very useful for debugging and troubleshooting my web projects; main reason, I’m trying on a real, working environment.

Thanks Apache Friends...